How to Make D.I.Y. Masks for Halloween
[ad_1]
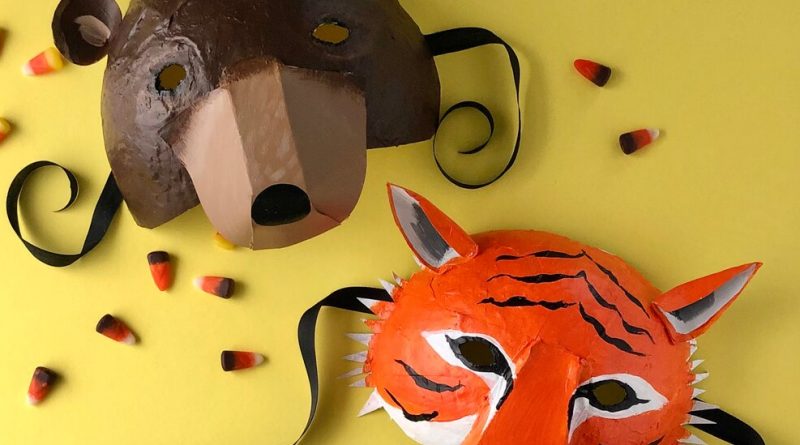
This Halloween, make a mask to go over …. your mask. All you’ll need is some flour, water, a balloon, paint and the newspaper you’re holding. Doing papier-mâché over a balloon is a fun, easy technique and yields a sphere that can be cut into two mask bases and transformed into any animal or creature you can dream up. Cut off the corners of recycled food boxes (like for crackers or cereal) to make snouts and ears, or horns and saber teeth.
Treasures from your recycling bin will provide inspiration for a whole menagerie of critters.
What you’ll need:
-
1 cup flour
-
1 cup warm water
-
Mixing bowl and spoon
-
Newspaper, torn into 1-inch strips
-
Balloon
-
Scissors
-
Craft knife
-
Recycled thin cardboard box, like ones used for cereal or crackers
-
Hot glue gun
-
Primer, paint and paintbrush
-
Ribbon or string
Step 1
Mix flour and water until all the lumps are gone. It should be the consistency of thin pancake batter.
Step 2
Dip a newspaper strip into the mixture, use two fingers to squeegee off excess and smooth it onto the balloon. You can steady the balloon by placing it in a colander or a bowl.
Keep covering the balloon, overlapping the strips in different directions. You can leave an opening around the knot. After you have covered the balloon, add one or two more layers. You shouldn’t be able to see the color of the balloon through the newspaper. Place the balloon on the colander to dry for about 24 hours.
Step 3
Once the papier-mâché is dry, pop and remove the balloon.
Step 4
Draw a line around the sphere vertically and cut it in half to create two mask bases. Cut an inch or so off the bottom (knot side).
Step 5
Cut eye holes: You can create a template for eye placement by holding a piece of paper against your face, pinching the paper where your eyes fall. Use a pencil to outline the eyes. Fold the paper in half and cut out eye holes to create a stencil. Mark the spots on your mask and cut out eyes with a craft knife.
Step 6
Make a snout: Cut a wedge shape out of the side of a cereal or cracker box so that the corners of the box will make the sides of the snout. Taper the top by folding the sides in and forming a rough triangle with your own creases. Hot glue the bottom flaps to overlap each other, underneath, where the nostrils will go. Trim as needed.
Make ears: Cut two V-shaped pieces off the other corner of the box, on the fold. Bring the two bottom tabs together to overlap and hot glue them in place. Fold in the ear flap on the left or right side of each.
Step 7
Hot glue the features to the mask base and paint the front with primer.
Step 8
When the primer has dried, snip some furry edges around the sides of the face. You can cut room under the snout for your nose, if needed.
Step 9
Paint orange and let it dry. Then paint on other features — stripes, a pink nose, whatever your animal needs.
Step 10
Turn the mask over and hot glue a ribbon to either side at eye level. Hot glue a small square of scrap cardboard over the ribbon to secure it.